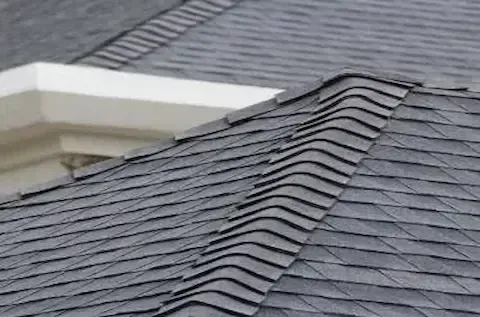
Asphalt Shingle Installation in Maple Grove MN Homes
Asphalt shingle installation requires careful planning, proper materials, and professional execution to protect your Maple Grove home for decades. The process involves multiple phases from initial assessment through final cleanup, with each step critical to your roof's long-term performance. Understanding what happens during installation helps you make informed decisions and ensures your project meets Minnesota's demanding weather requirements.
Material Selection for Maple Grove Climate
Minnesota's extreme temperature variations demand specific asphalt shingle characteristics. Three-tab shingles offer basic protection but architectural shingles provide superior wind resistance and dimensional appeal. Luxury shingles deliver maximum durability against hail and thermal cycling common in the Twin Cities metro area.
Wind rating becomes crucial in Maple Grove, where storms frequently generate 60+ mph gusts. Class 4 impact-resistant shingles earn insurance discounts while protecting against hail damage. Algae-resistant granules prevent unsightly streaking in our humid summers, maintaining your home's curb appeal longer than standard materials.
Color selection affects energy efficiency and longevity. Lighter colors reflect Minnesota sunlight, reducing cooling costs and thermal stress. Darker shades absorb heat, potentially accelerating granule loss but providing better snow melt patterns. Your contractor should discuss how color choices impact performance in our specific climate zone.
Underlayment requirements exceed basic code minimums for optimal protection. Ice and water shield coverage extends beyond valleys and eaves in northern climates. Synthetic underlayment resists tearing during installation and provides superior secondary protection compared to felt alternatives.
Pre-Installation Preparation Process
Professional assessment begins with structural evaluation of your existing roof system. Decking inspection reveals damaged plywood or OSB requiring replacement before shingle installation. Rafter evaluation ensures adequate support for new materials, particularly important when upgrading from lightweight three-tab to heavier architectural shingles.
Weather considerations dominate scheduling in Minnesota. Installation requires consecutive dry days for proper adhesion and worker safety. Spring and fall provide optimal conditions, avoiding summer heat stress and winter freeze-thaw cycles. Your contractor should monitor extended forecasts and adjust timelines accordingly.
Material delivery coordination prevents weather exposure and jobsite congestion. Shingle bundles require dry storage and proper handling to prevent damage. Delivery timing aligns with tear-off schedules, minimizing your home's exposure period. Proper staging areas protect landscaping and provide efficient workflow.
Permit acquisition ensures code compliance and proper inspections. Maple Grove building officials verify contractor licensing and insurance coverage. Inspection scheduling coordinates with installation milestones, preventing delays in project completion. Your contractor handles permit applications and inspection coordination as part of professional service.
When considering comprehensive roof replacement projects, our Maple Grove roof replacement overview provides detailed information about the complete process from assessment through final inspection.
Installation Timeline and Phases
Day one focuses on tear-off and preparation work. Complete removal of existing materials exposes underlying issues requiring immediate attention. Debris removal maintains clean work areas and prevents damage to surrounding property. Initial underlayment installation begins once decking passes inspection.
Shingle installation follows systematic patterns ensuring proper water shedding and wind resistance. Starter strip placement along eaves and rakes provides secure anchor points for first course installation. Each subsequent course overlaps according to manufacturer specifications, creating multiple water barriers.
Ridge and hip installation requires specialized techniques and materials. Proper ventilation integration maintains airflow while preventing weather infiltration. Cap shingle installation provides finished appearance and weather seal. Flashing integration around penetrations demands careful attention to prevent future leaks.
Quality control inspections occur throughout installation, not just at completion. Nail placement, exposure measurements, and alignment verification ensure manufacturer warranty compliance. Professional installers document progress and address issues immediately rather than discovering problems during final inspection.
Typical installation duration ranges from two to four days depending on complexity and weather cooperation. Simple ranch homes with minimal penetrations complete faster than complex multi-level designs. Weather delays extend schedules but rushing installation compromises quality and warranty coverage.
Critical Installation Details
Nail placement affects shingle performance and longevity more than any other installation factor. Overdriven nails tear shingle material and create leak points. Underdriven nails allow shingle movement and wind damage. Proper pneumatic pressure settings and regular adjustment maintain consistent fastening throughout installation.
Ventilation integration requires coordination between intake and exhaust components. Soffit vents provide air intake while ridge vents create exhaust pathways. Balanced ventilation prevents moisture accumulation and extends shingle life. Improper ventilation voids manufacturer warranties and accelerates deterioration.
Flashing installation demands waterproofing expertise around chimneys, skylights, and wall intersections. Step flashing provides multiple overlapping barriers against water infiltration. Counter flashing seals against vertical surfaces while allowing thermal movement. Professional installation prevents the majority of leak problems in completed roofs.
Valley treatment varies based on roof design and local requirements. Open valleys use metal flashing for maximum water flow. Closed valleys weave or cut shingles for seamless appearance. Proper valley installation prevents ice dam formation and handles heavy water flow during storms common in Maple Grove.
Weather Considerations for Minnesota Installation
Temperature limitations affect installation timing and techniques. Shingles become brittle below 45°F, increasing breakage risk during handling and cutting. Summer heat above 85°F makes walking dangerous and can cause premature seal activation. Professional contractors adjust techniques and schedules based on weather conditions.
Wind resistance requirements reflect Minnesota's storm frequency and intensity. Proper nail placement in the nail zone provides rated wind resistance. High-wind installation techniques include additional fasteners and sealant application. Understanding local wind patterns helps contractors position materials for maximum durability.
Moisture management during installation prevents immediate and long-term problems. Temporary tarping protects work areas during weather interruptions. Quick installation completion minimizes exposure time. Professional crews maintain weather readiness throughout project duration.
Seasonal timing affects material performance and installation quality. Spring installation allows full summer heat activation of adhesive seals. Fall completion provides weather protection before winter storms arrive. Winter installation requires specialized techniques and may affect warranty coverage depending on manufacturer requirements.
Quality Assurance and Inspection Points
Municipal inspections verify code compliance and proper installation techniques. Maple Grove inspectors focus on structural integrity, ventilation adequacy, and safety compliance. Failed inspections delay completion and may require material replacement. Professional contractors understand local requirements and pass inspections consistently.
Manufacturer inspections protect warranty coverage and ensure proper installation. Factory representatives verify nail placement, exposure measurements, and material handling. Documentation requirements include photos and installation records. Warranty activation depends on passing manufacturer inspection when required.
Internal quality control maintains consistent installation standards throughout the project. Crew supervision ensures technique consistency and identifies problems before they become systemic. Regular measurements verify proper exposure and alignment. Professional companies maintain quality standards regardless of external inspection requirements.
Final walkthrough identifies any issues requiring correction before project completion. Homeowner education covers maintenance requirements and warranty procedures. Documentation delivery includes permits, inspections, and warranty registration. Professional completion includes thorough cleanup and restoration of landscaping areas.
Professional vs DIY Installation Considerations
Professional installation provides warranty coverage, insurance protection, and quality assurance unavailable with DIY approaches. Licensed contractors carry liability insurance protecting homeowners from installation accidents. Manufacturer warranties require professional installation for full coverage activation. Code compliance ensures proper techniques and material usage.
Safety requirements make roofing among the most dangerous DIY projects. Fall protection equipment and training prevent serious injuries. Weather awareness prevents accidents during changing conditions. Professional crews maintain safety protocols and carry appropriate insurance coverage for accident protection.
Tool and equipment requirements exceed typical homeowner capabilities. Pneumatic nailers ensure proper fastening and installation speed. Safety equipment includes harnesses, ladders, and protective gear. Material handling equipment prevents damage and reduces installation time. Professional contractors maintain specialized tools for optimal results.
For specialized services like Asphalt Shingle Installation, experienced contractors provide expertise, warranty protection, and professional results that protect your investment and ensure long-term performance in Minnesota's challenging climate conditions.
Cost Factors and Investment Protection
Material grades significantly impact total project costs and long-term value. Basic three-tab shingles offer lowest initial cost but shorter lifespan and limited warranty coverage. Architectural shingles provide better durability and appearance at moderate price premiums. Luxury shingles deliver maximum longevity and weather resistance justifying higher initial investment.
Labor costs vary based on roof complexity and accessibility. Simple ranch designs install efficiently with minimal setup requirements. Multi-level homes with numerous penetrations require additional time and specialized techniques. Steep slopes and limited access increase labor requirements and safety precautions.
Disposal costs affect total project budgets particularly for multiple-layer removal projects. Maple Grove waste disposal regulations require proper debris handling and disposal site fees. Volume-based pricing rewards efficient removal and proper sorting. Professional contractors include disposal costs in project estimates rather than charging separately.
Permit and inspection fees represent necessary project costs ensuring legal compliance. Maple Grove building permits cost varies based on project value and complexity. Inspection scheduling prevents delays and ensures code compliance. Professional contractors include regulatory costs in comprehensive project pricing.
Insurance considerations may offset installation costs through premium reductions. Impact-resistant shingles earn discounts with many carriers. Proper installation documentation supports claims processing. Professional installation meets insurance requirements and provides necessary documentation for coverage verification.
